Google Colab
Managing local Python installations can be troublesome with a large class. Different versions, dependencies, and system setups could mean it runs on your computer but not elsewhere. To minimize these issues, we will be using Google Colab to write, run, and distribute Python code in Jupyter Notebooks.
Features
- Google Colab runs in the cloud on Google's servers. This means you don't need to install any software on your local machine, and you can access it from anywhere with an internet connection.
- One of the notable features of Google Colab is that it provides free access to Graphics Processing Units (GPUs) and Tensor Processing Units (TPUs). This can be especially beneficial for machine learning tasks that require significant computational power.
- Multiple users can collaborate in real-time on a Colab Notebook. This makes it easy for teams to work together on coding projects, share insights, and provide feedback.
- Colab integrates seamlessly with Google Drive. You can save your Colab Notebooks directly to your Google Drive, share them, and access them from any device.
- Colab Notebooks run on virtual machines in the cloud, and your session state persists as long as the virtual machine is active. However, if there is inactivity for too long, the session may be disconnected.
Opening files in Colab
When you see a  symbol in the upper right corner on a page of this website, you can click on it to open up that file directly in Google Colab.
How does this work? Well, Google Colab has an import mechanism for Jupyter Notebooks in GitHub repositories. Adding an import link is all it takes.
When you open up our Jupyter notebooks in Google colab, you will be met with this screen.

Jupyter notebooks are made up of cells which can be thought of as paragraphs that can change types. Markdown is simply text like you would put in a Word document, email, etc. The only difference is how you specify things like a list, link, etc.
When you see a [ ] on the left with a greyed out background, this is a Python cell.
You can put any Python code here and run it.
We will get to this later.
When working on Jupyter notebooks from this website, you should always save a copy to your Google Drive.
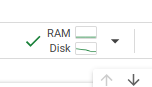
To run Python code, you have to connect to Google's servers. When you click this button, it will initiate a connection to Google's servers and will look like this once it is done.
Downloading
In most cases, you will need to upload your assignment to Gradescope as a Python file (.py).
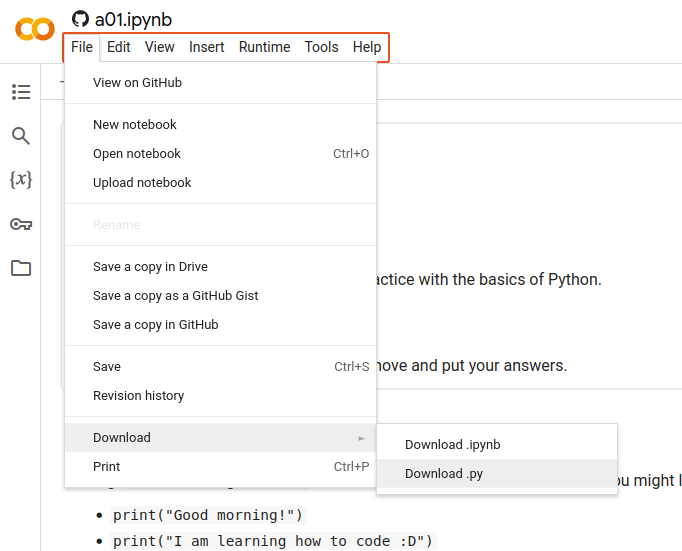
This will download your Jupyter Notebook as a Python script that my autograder can use. It will comment out all markdown cells and then run your Python code from top to bottom.
Cells
A Jupyter notebook consists of a sequence of cells. The flow of a notebook is sequential from top to bottom. You enter code into an input cell, and when you run the cell, the notebook runs the code and prints the output of the computation to an output cell.
For example, we can look at the following Python code.
This Python code should print the string "Your message here!" once we run it. The figure directly below shows the ▷ on the left, which means we can run the Python code in that cell.

Once we run this, you would see the figure below.
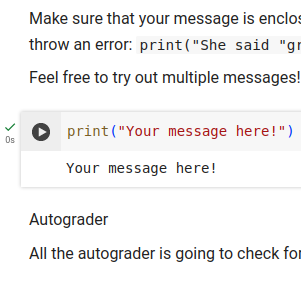
You can tell that the Python cell was ran at some point by the ✓ to the right with no errors.
The 0s below the ✓ just tells you how many seconds it took to run.
We can also see the cell output contains Your message here!.
If you make any changes to this cell, you have to run it again.
Do not worry, you do not have to keep clicking a bunch of ▷ to run all of your cells. We have some shortcuts:
- Windows: Ctrl+Enter
- Mac: Cmd+Enter
- Linux: Ctrl+Enter
Python kernel
You may hear me use the term "kernel" or "Python kernel" frequently throughout the course. It can be thought of as a mini computer running in the background of your computer. By running Python code in a Jupyter notebook, you are giving instructions to the kernel, the kernel does some processing, then it will give you any outputs you requested.
Stopping and starting the kernel is very similar to restarting your own computer. You get a fresh kernel each time, and this is a good first step for troubleshooting any issues.
When you open up our Jupyter notebooks in Google colab, you will be met with this screen.

You can restart the kernel from the Runtime menu at the top left with two options:
- Restart session: This is essentially turning the kernel on and back on again. However, this does not automatically run all of your Python code.
- Restart session and run all: This restarts the kernel, but then also runs all of your Python cells from top to bottom. Usually you want to use this one.
Persistent
One crucial aspect of Jupyter notebooks to be aware of is that the kernel is persistent. This means that it keeps track of everything you ran while connected to Google's servers. Variables, functions, and computations performed in one Python cell are available in other Python cells—before or after. For example, suppose I have the following three cells:
1:
2:
3:
If I ran cell 1 and then tried to run cell 2, Python would give me an error because course is not defined.
However, if I then ran cell 3, then ran cell 2 again it would work!
This is because the whole Python kernel shares memory; changing anything would update the shared memory and would affect Python cells that run after.
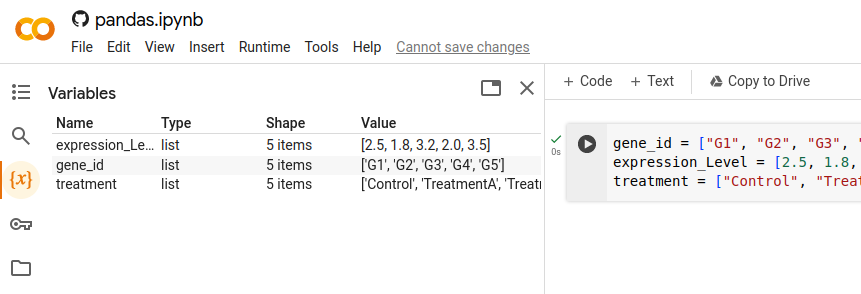
Inspecting
Because all cells share the same kernel, we can actually view (i.e., inspect) what variables we have and what they are defined as. Suppose I define three lists like so.
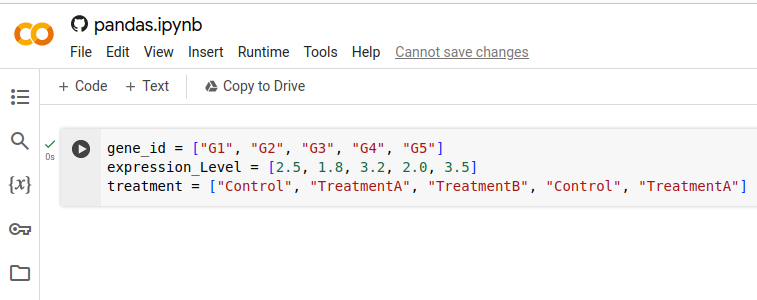
If I click on the \(\{x\}\) symbol on the left, Jupyter will show me all of the variable names, types, values, and other information.
Reproducibility
As mentioned above, the version of Python can affect its reproducibility. We include the following code as the first code cell.
import sys
IN_COLAB = 'google.colab' in sys.modules
if IN_COLAB:
    !sudo apt-get update -y > /dev/null 2>&1
    !sudo apt-get install python3.11 python3.11-dev python3.11-distutils libpython3.11-dev > /dev/null 2>&1
    !sudo update-alternatives --install /usr/bin/python3 python3 /usr/bin/python3.11 2 > /dev/null 2>&1
All this does is check if the Jupyter Notebook is running and install the version of Python used to develop this course: 3.11.
You can technically remove this. The version of Python usually has small changes that are backward compatible. The main issue is the dependencies that we install; some have very specific version requirements that could affect which versions get installed.